Advice after your nerve block for surgery
On this page…
You or your relative has been admitted with a tibial plateau fracture
This page has been designed for you by health professionals to provide you and your relatives with information that may help guide you through your hospital stay.
Our aim is for you to regain an appropriate level of function and return to your home environment with a suitable level of assistance.
If your tibial fracture requires surgery, then we anticipate a hospital stay of around 1-2 weeks. However, some patients may recover quicker, and others may require a bit more time.
Surgery improves the pain in the leg and allows the patients to get up and walk. The type of surgery a patient has depends on the type of tibial fracture that has occurred.
What is a tibial plateau fracture?
A tibial plateau fracture is when the top section of your tibia (shin bone) breaks. This is known as a tibial plateau fracture.
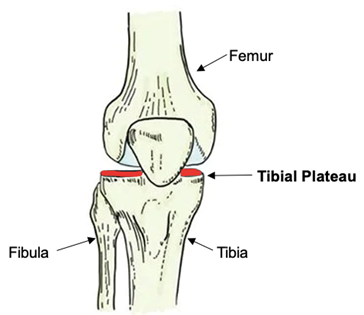
The femur, also known as the thigh bone, sits on top of the plateau to form the knee joint. When a tibial plateau fracture occurs, it can affect the range of movement and stability within the knee joint. You may also have some damage to the surrounding muscles and ligaments.
What causes a tibial plateau fracture?
High energy trauma is the most common cause of a tibial plateau fracture. These include falls from height, motor vehicle accidents, or high impact sports. These are more common in a younger male population (under 50).
However tibial plateau fractures can also occur from low energy traumas, especially in the older population secondary to a fall. Falls are common among our older population, and one in three people over 65 will fall each year. As we get older, our bones become weaker, making them more prone to breaking. Osteoporosis and other bone diseases can increase the effect of age and further weaken bone.
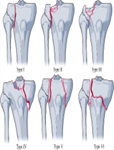
Classification of Fracture Types
Tibial plateau fractures are usually classified using Schatzker’s classification but note this is not applicable to every tibial plateau fracture.
- Schatzker I: Lateral Plateau Split Fracture
- Schatzker II: Lateral Plateau Split-Depressed Fracture
- Schatzker III: Lateral Plateau Pure Depression Fracture
- Schatzker IV: Medial Plateau Fracture
- Schatzker V: Bicondylar Plateau Fracture
- Schatzker VI: Metaphyseal-Diaphyseal Dissociation
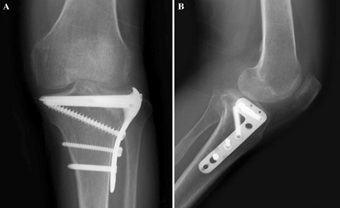
Operative Management
Your tibia will either be fixed or replaced depending on the site of fracture.
- Open Reduction and Internal Fixation
The broken bones are realigned, and metal plates and/or screws are applied to hold the bones in place to allow it to heal.
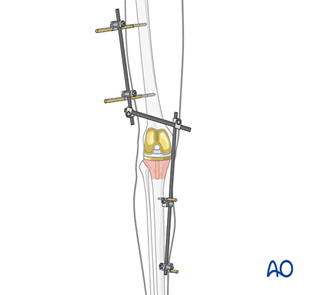
- External Fixation - Bridging
The broken bones are held in place externally by pins and bars above and below the knee, to stabilise the fracture site and maintain the bones alignment.
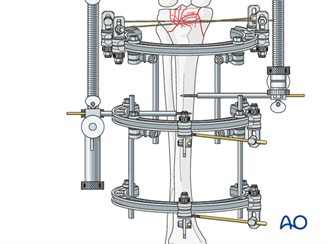
- External Fixation - Ring
The broken bones are held in place externally by a frame in the shape of a ring and small pins and wires. This helps stabilise the fracture site and maintain the bones alignment.
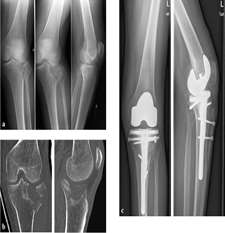
- Total Knee Arthroplasty
The damaged bone surfaces in your knee are replaced with artificial metal and plastic components to improve the stability and function within the knee.
In some cases, you may require a bone graft or calcium phosphate cement to provide further support and stability to the fixated bone.
- Bone Graft
- Calcium Phosphate Cement
Conservative Management
The doctors looking after you may decide after reviewing your x-rays that they want to treat your injury conservatively (without surgery).
They may decide not to do an operation if your fracture has remained well aligned, or if you have lots of other medical conditions which may put you at high risk of becoming unwell during an operation.
Any decisions about your injury will be discussed with you and your family.
Weight-Bearing Status
The consultant looking after you will make a decision around how much weight you can put through your injured leg. Your Physiotherapist will assist in teaching you how to maintain these weight-bearing statuses. Below are all the weight-bearing statuses:
- Non-Weight Bearing (NWB)- This means you can not put any weight through your injured leg. You should keep the foot of your injured leg off the floor
- Limited Weight Bearing (LWB)- This means you can put some weight, but not all of it, through your injured leg. Using a walking aid such as a wheeled zimmer frame or two crutches will assist you to maintain partial weightbearing.
- Unrestricted Weight Bearing (UWB)- This means there is no restriction in how much weight you can put onto your injured leg. This term can be interchangeable with the term ‘weight bear as tolerated’ (WBAT).
The Anaesthetic
A spinal anaesthetic or general anaesthetic is used during an operation for a fractured tibial plateau.
A spinal anaesthetic is when a local anaesthetic drug is injected through a needle into a small space in the back to numb the nerves from the waist downwards. This may be combined with sedation to help relax during the procedure and the operation.
Alternatively, a general anaesthetic may be used. This is when medicines are used to give a state of controlled unconsciousness during the operation. Pain relief may be given by a nerve block or numbing solution around the joint itself prior to the op. The aim is to reduce the pain and the amount of strong pain killers such as morphine, which can have common side effects of nausea and vomiting, confusion, bladder irritation and constipation.
The Operation
The operation on average takes 60-90 minutes, you will then be taken into recovery to be monitored before being transferred back to the ward. If you would like any further information regarding your operation, please do not hesitate to ask one of the doctors on the ward who will be happy to discuss this with you.
Resuscitation
Many patients who fracture their tibial plateau are frail and have many significant underlying health issues. It is not unusual for patients to become more unwell in the recovery period after an operation. We encourage patients and their relatives to discuss with the doctors what their wishes would be, should they become more unwell whilst in hospital.
The doctors routinely discuss resuscitation during the admission process. Resuscitation is where we perform CPR (chest compressions and electric shocks) to re-start the heart after it has stopped (cardiac arrest). The rate of survival of frail elderly patients who experience a cardiac arrest in hospital is very low, the resuscitation process is very invasive and the risk of brain damage, rib fractures and pneumonia very high. The decision to perform or not perform CPR is a medical decision. For those who have a ‘Do not attempt CPR’ decision (DNACPR) this does not prevent you from receiving other treatment on the ward such as antibiotics, IV fluids, oxygen therapy or rehab.
Your ward team
You will be looked after on the ward by a variety of health professionals. All members should be wearing an identification badge to help you recognize them.
Here is a brief reference guide of their roles:
Doctors:
- Doctors either wear their own clothes or scrubs.
- You will be admitted under the care of an Orthopaedic Consultant and their team. You will be seen by them following your operation
- If you’re 65 and over, you will be seen by our Consultant Orthogeratrician and their team who specialise in the management of fragility fractures and medical issues in the older person alongside the Orthopaedic team.
Nursing staff:
- The role of a nurse is to administrate medication, assist with personal care and monitor your well-being.
- Nursing staff wear blue trousers and tops in various shades of blue. Ward sister (navy blue), senior sister (royal blue) and junior nurse (pale blue).
Physiotherapists:
- The physiotherapist on your ward will get you out of bed the day after your surgery and work with you regularly with the aim to get you on your feet as soon as possible
- They will provide you with any mobility aids you may require
- They wear navy blue trousers/shorts and a white polo top or tunic
Occupational Therapists (OT):
- The OT will see you after your surgery and assess your needs to go home
- If they feel you require support at home, they will provide you with or recommend any equipment and help you may need to assist you with this.
- They wear green trousers and a white polo top or tunic
Other Ward Staff:
- Health care assistants (wear black trousers and light green tops or light purple tops). They are there to assist you with any personal care or needs on the ward.
- Pharmacy (do not wear uniform) ensure you have been prescribed appropriate medication and prepare any medication needed to go home.
- Porters (navy blue top and trousers) ensure you get to any areas of the hospital outside of the ward for medical reasons.
- Dieticians (do not wear uniform) will assess your nutritional needs if needed. They are able to advise you on what food and drink you should be consuming, and can provide additional nutritional support if required.
Day 1 Post-Surgery
- Your wound will be checked by a nurse and/or consultant.
- You will be reviewed by orthopaedic team and by the orthogeriatric team (less than 72 hours from your admission, if over 65).
- You will have a routine blood test and in some cases an X-Ray of your knee/tibia.
- You are encouraged to eat and drink normally. It’s important that you keep hydrated to help with recovery.
- You will receive regular pain relief, but you may be written up for additional pain relief if your pain is severe or to allow you to mobilise more easily. You will need to request this extra pain relief.
- Your bladder and bowel function will be monitored, and your catheter should be removed the day after the operation.
- You will be assessed by a physiotherapist, taught the exercises at the back of this booklet and mobilised out of bed. Once you have been taught the exercises, it is your responsibility to carry these out independently if able.
- We encourage patients to be in their own clothes so ask your visitors to bring items such as supportive footwear and comfortable clothing to help promote your recovery.
Day 2 Onwards
- You should be sitting out of bed daily, ready for physiotherapy sessions.
- You will be reviewed by the physiotherapist regularly with the aim of walking further every day.
- If you need to climb stairs at home, you will practice this in hospital.
- You should be carrying out your exercises 3 times per day independently if able to.
- You should be getting dressed daily, please ask for help from health care assistants or nursing staff if needed.
- The OT will assess how you will manage day-to-day tasks and whether you may need any aids at home.
- Your memory will be assessed, and you will be monitored for acute confusion, about half of people with a femur fracture already have memory problems or become temporarily confused (delirium).
- Your risk of further falls will be assessed and acted upon (medication review, strength and balance exercises, occupational therapist assessment)
- Your risk of osteoporosis will also be assessed, and you may be started on bone protection (vitamin D, calcium, bisphosphonates), sent for a special scan of your bones or referred to the outpatient rheumatology clinic for follow up.
Leaving the Hospital
- Following your operation, we aim to discharge you from hospital to your home as soon as you are medically stable and safe to continue your recovery at home.
- The doctors will need to declare you as medically stable for discharge prior to going home and provide you with discharge letters. This may happen at a different time to when the physiotherapy and occupational therapy team deem you safe to return home.
- Depending on your mobility, you will need to discuss transport to get home, if you need assistance the nurses can help arrange this
- Pharmacy will arrange your medication for going home.
- Any outpatient or community referrals will be made upon your discharge.
- If help is required at home for personal and domestic care, this will be put in place prior to your discharge from hospital. However, some patients may need a period of time in a step-down hospital in their local area prior to going home to progress with their independence.
- Your discharge plans may change as you improve whilst you are on the ward. These plans are made by the professionals that work alongside you and have assessed your needs, however this will be discussed with you and your family at the time.
Exercises
Day 1 post-op, you will be expected to carry out the following bed exercises up to 3 times a day. As per the consultant's advice, you may have a period of non-weight bearing, therefore it is important we keep this leg moving as much as possible to maintain circulation and muscle strength, whilst reducing muscle stiffness.
The physiotherapy team will teach these to you during your session, with any changes/adaptations communicated with you and corrected in your booklet.
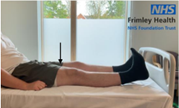
| Lying on your back with legs straight. Bring your toes up towards your shins, then point your toes away. This can be performed on both legs. Perform 5-10 times - 3 times a day. |
|
|
Lying on your back with legs straight. This can be performed on both legs. |
|
|
|
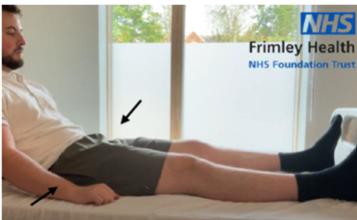
Lying on your back with legs straight. You should feel your thigh muscle tighten. Hold for 5 seconds, then relax. |
|
|
Lying on your back with legs straight. Hold for 5 seconds then relax. Perform 5-10 times - 3 times a day. |
|
|
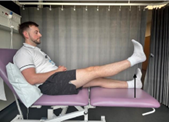
Lying on your back with legs straight. Bring your toes towards your shins. Keeping the knee straight, gently lift your operated leg off the bed. Hold for 5 seconds, then relax. Perform 5–10 times – 3 times a day. |
|
|
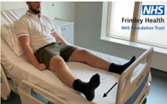
Lying on your back with your legs straight. A plastic bag or slide sheet under your foot can help. Perform 5-10 times – 3 times a day. |
Brace Management
Irrespective of whether you have had surgical or conservative management, you may be required to wear a knee range of movement brace for 6 weeks+.
This will be set up by the surgeon or physiotherapist in the correct position to limit the amount of movement you can perform. Do not change the brace settings.
When taking the brace off/putting the brace on, follow the instructions below.
Taking the brace off
- Lying on a bed or supportive surface, so there is no weight going through the leg.
- Undo each strap by unclipping it as shown in the pictures
Putting the brace on
- Lie your hinge brace out flat, preferably on a surface that is supportive on your knee.
- Gently slide your leg onto the knee brace.
- Position your knee on the brace so that the dials are either side of your knee, and the widest part of the brace is closest to your thigh.
- Secure the brace in place by clipping the straps and tightening the straps to prevent the brace from sliding down the leg. Start with the two clips above and below that are closest to your knee.
- Then secure the two clips that are furthest away from the knee.
- Ensure the straps are not too tight and restricting circulation.
Skin management when using the brace
Regularly check the skin enclosed by your brace and seek medical advice if you notice any irritation or pain. When cleaning the skin, ensure your knee remains supported and straight. Once your leg is dry, you must reapply the brace using the instructions provided.
Stair Management
If it is essential to use the stairs and you have not been advised otherwise, try to have someone with you until you feel safe. Hold onto at least one handrail if possible. If you have crutches, hold the spare crutch together with the handle of the remaining crutch.
GOING UP (LWB/UWB)
Remember ABC
- Keeping the crutches at the same level as you, step up with the able/good/unaffected leg.
- Push on your crutches and bring the bad/affected leg up.
- Finally moving the crutches up to the same level and repeat.
GOING DOWN (LWB/UWB)
Remember CBA
- Place your crutches onto the step below.
- Take some of your weight through the crutches and step down with the bad/affected leg.
- Finally step down to the same level with the able/good/unaffected leg.
GOING UP (NWB)
- Keeping the crutches at the same level as you, hop up with the good/unaffected leg.
- Move your crutches up to the same level and repeat.
- Alternatively, you may be shown how to mobilise on the stairs by going up on your bottom. In which instructions will be provided when completing the stairs assessment.
GOING DOWN (NWB)
- Place your crutches onto the step below.
- Take all your weight through the crutches, hop down onto the good/unaffected leg and repeat.
- Alternatively, you may be shown how to mobilise on the stairs by going down on your bottom. In which instructions will be provided when completing the stairs assessment.
Useful Contacts
Hospital Switchboard – 0300 614 5000
Wexham Park
Ward 1 Reception 0300 615 3012
Ward 1A 0300 615 3014
Ward 1B 0300 615 3874
Ward 1C 0300 615 3140
MSU 0300 615 4455
Ward 2 Orthopaedics 0300 615 3801
Frimley Park
Orthopaedic Physiotherapy Office- 0300 613 4625
Ward F4 Reception – 0300 613 4865
Ward F5 – 0300 613 6698
Ward F6 Reception – 0300 613 4173
Contact us
If you have any queries relating to this information, please contact the Orthopaedics service.
About this information
Service:
Orthopaedics
Reference:
BB/106
Approval date:
1 October 2025
Review date:
1 November 2026
Click ‘show accessibility tools’ at the bottom of the page

Then click ‘select language’
![]()
Alternative formats
You can use the accessibility toolbar at the bottom of your screen to:
-
Change the text size
-
Adjust the font
-
Modify the colour contrast
-
Use the translate function
If you would like this information in another format, such as Braille, audio, or easy read, please speak to a member of staff.
You can also print as well as download as PDF using the “Print this page” button at the end of the page.
Staff will print a copy for you on request
Important note
This page provides general information only. It is developed by clinical staff and is reviewed regularly every 3 years for accuracy. For personal advice about your health, or if you have any concerns, please speak to your doctor.