Advice after your nerve block for surgery
On this page…
Introduction
This passport has been created to provide you with information about your tunnelled pleural catheter (TPC). Please keep this passport with you and share it with any healthcare provider who may be involved in your care. Not all healthcare staff will be familiar with this device and should call the pleural hotline 07500 064438 for advice.
Reason for Catheter:
The tunnelled pleural catheter has been placed to drain fluid from the pleural space, which is the area surrounding the lung under the ribs. Commonly these catheters are placed where pleural fluid reaccumulates rapidly such as in cancer.
Type of Catheter:
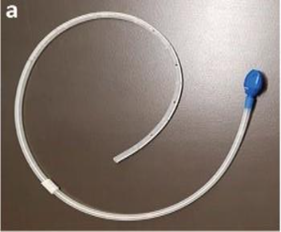
The tunnelled pleural catheter is a thin, flexible tube that is placed under the skin and into the pleural space. The catheter has a cuff that helps to secure it in place and prevent infection.
Placement of Catheter:
The tunnelled pleural catheter was placed in a day care procedure under local anaesthesia. The catheter was placed in the chest wall, and the end of the catheter was tunnelled under the skin to a location where it can be easily accessed.
How the Catheter Works:
The tunnelled pleural catheter allows for the drainage of fluid from the pleural space (the area between the outside of the lung and the ribs). The catheter is attached to a drainage bag or bottle that collects the fluid.
Section 2: How to drain fluid from the catheter, step by step guide:
(To be done by Health Care Professionals unless training provided to patient/carers)
- You will need a clean, clear workspace, ideally a table or bench top. Thoroughly wash your hands with soap and water. Drainage kit needed to drain the fluid is shown in figure (A)
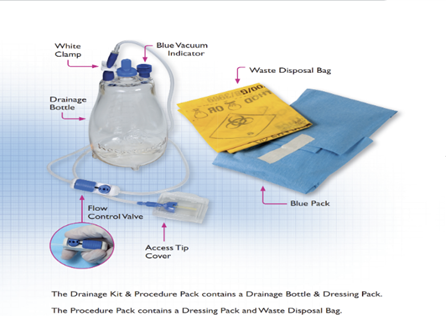
Figure A
- Remove the dressing from over the catheter. Document any abnormalities such as redness, swelling or fluid around the catheter. Seek help if concerned.
- Place the bottle on the edge of the sterile field place the access tip onto the sterile field.
- The white slide clamp on the top of the vacuum bottle is there to prevent a loss of vacuum in the bottle. The bottle contains a vacuum when it is supplied.
- Take alcohol wipes, open, and place them onto the sterile field.
- Open the pouch containing the valve cap and carefully let the cap drop into the middle of the sterile drape.
- Remove the access tip cover and remove the catheter cap by gently rotating anticlockwise and pulling gently (Figure B). Using a new alcohol wipe, gently clean around the outside of the catheter valve (Figure C).
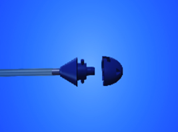
Figure B
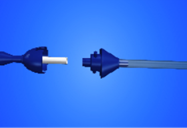
Figure C
8. Pick up the drainage line of the bottle and gently insert the access tip into the valve (Figure D) You will feel a little resistance while you do this, which is normal.
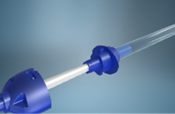
Figure D
9. Lock the two together by lining them up as shown and rotating clockwise. This will click. (Figure E)
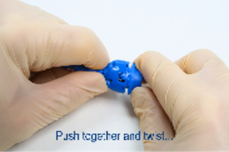
Figure E
10. To drain the fluid, hold the bottle and slide the white clamp to its open position.
11. The TPC drainage bottle has a flow control valve. Press the push button gently to start flow. If this is comfortable increase the pressure on the button to give full flow.
12. On completion of the drainage, replace the cap, replace the tubing to original position and cover the wound with a dressing.
Important:
- During the drainage procedure it can be quite normal to feel some mild discomfort. If experienced, slow down the flow by releasing the button slightly until a comfortable flow rate is achieved. The flow can be stopped altogether by releasing the button fully.
- Do not drain more than 1000ml, which is 1 large bottle or 2 small bottles in one session
Do and Don’ts with Tunnelled Pleural Catheters:
DO:
- Follow your healthcare provider’s instruction regarding care and maintenance of TPC
- Keep the TPC insertion site clean and dry
- Use sterile technique when performing TPC dressing changes or flushing.
- Keep the TPC capped when not in use
- Beware of the signs of infection such as fever, redness, swelling or drainage around the TPC insertion site, and report them to your health care provider immediately.
- Always use the appropriate drainage line, bottles and connectors for the drainage and maintenance.
- The TPC should be properly secured to prevent accidental removal or dislodgement.
DON’T:
- Do not pull on the TPC or allow it to become dislodged
- Do not allow TPC insertion site to be to become wet or contaminated.
- Do not use harsh or irritating cleansers or ointment on the TPC insertion site
- Do not flush the TPC with non-sterile water
- Do not ignore signs of infection or other complications associated with TPC.
- Keep sharp objects away from TPC to avoid physical damage to TPC.
- Under no circumstances cut the TPC for drainage or flushing
Contact us
If you have any queries relating to this information, please contact the Respiratory medicine service.
About this information
Service:
Respiratory medicine
Reference:
W/046
Approval date:
1 December 2025
Review date:
1 December 2028
Click ‘show accessibility tools’ at the bottom of the page

Then click ‘select language’
![]()
Alternative formats
You can use the accessibility toolbar at the bottom of your screen to:
-
Change the text size
-
Adjust the font
-
Modify the colour contrast
-
Use the translate function
If you would like this information in another format, such as Braille, audio, or easy read, please speak to a member of staff.
You can also print as well as download as PDF using the “Print this page” button at the end of the page.
Staff will print a copy for you on request
Important note
This page provides general information only. It is developed by clinical staff and is reviewed regularly every 3 years for accuracy. For personal advice about your health, or if you have any concerns, please speak to your doctor.